
Learning how to connect two monitors is usually a matter of matching the right ports, plugging each display into a video-capable output, and changing one display setting. Most Windows PCs can extend the desktop across both screens without extra software. Laptops with limited ports may need a USB-C dock, Thunderbolt dock, or compatible display adapter.
To create a dual-screen setup, connect each display to a separate video-capable output on your computer or a compatible dock. Turn on both screens, choose the correct input, and then set your operating system to Extend instead of Duplicate. Finally, arrange the display icons so they match the physical positions on your desk. For a closer look at this, see Dual Monitor Setup.
| What to check | What you need to know |
| Computer outputs | HDMI, DisplayPort, USB-C with video, or Thunderbolt |
| Monitor inputs. | Usually HDMI, DisplayPort, or USB-C |
| Basic setup | One video connection for each independent display |
| One-port laptops | A compatible dock, adapter, or supported daisy-chain setup may be needed |
| Windows mode | Choose Extend for separate desktop space. |
| macOS support | Check your exact Mac model before connecting multiple external displays. |
| HDMI splitter | Usually duplicates one signal rather than creating an extended desktop |
What You Need Before Connecting Your Displays

Start by checking the video ports on your computer and the inputs on each screen before learning how to connect two monitors successfully. HDMI and DisplayPort are common on desktops, while newer laptops often rely on HDMI, USB-C, or Thunderbolt. A USB-C connector alone does not guarantee video support, so check whether the port supports DisplayPort Alt Mode, USB4, or Thunderbolt before buying a cable or dock.
You should also confirm how many external displays your computer supports at the resolutions and refresh rates you plan to use. This matters most with compact laptops, high-resolution screens, and systems using a single USB-C connection. If you are considering different laptop hardware, Technolf’s business and personal laptop guide can provide additional background on common computer options.
Gather the following items before you begin.
- Both displays and their power cords.
- One compatible video cable for each screen.
- An HDMI, DisplayPort, USB-C, or Thunderbolt output for each video signal.
- A compatible dock or adapter if your computer lacks enough outputs.
- Your computer or laptop manufacturer’s display-support specifications.
How to Connect Two Monitors in 7 Steps
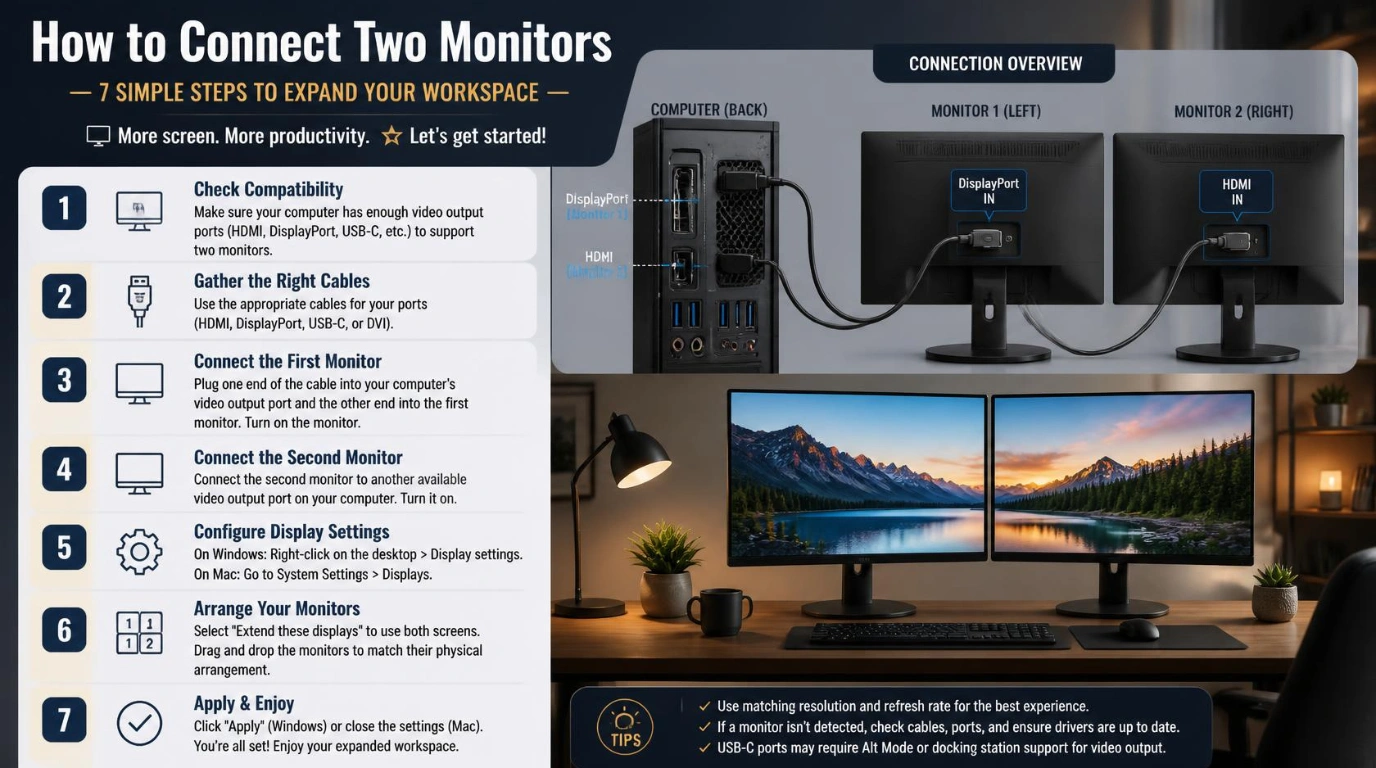
- Check your computer’s video outputs. Look for HDMI, DisplayPort, USB-C, or Thunderbolt connections. On a desktop with a dedicated graphics card, use the card’s display outputs unless your computer documentation says otherwise.
- Check the inputs on each display. Identify which HDMI, DisplayPort, or USB-C connections are available. Choose cables that connect the computer’s outputs directly to those inputs whenever possible.
- Connect the first display. Plug one end of the video cable into your computer or dock and the other end into the screen. Connect its power cord and switch the display on.
- Connect the second display. Use a separate video output or a supported multi-display dock for the second connection. Avoid assuming that a simple HDMI splitter creates a separate desktop.
- Select the correct input on each screen. Use the monitor’s physical buttons or on-screen menu to choose HDMI, DisplayPort, or USB-C. A screen set to the wrong input can show “No Signal” even when the cable is connected correctly.
- Set the computer to extend the desktop. Windows users can select Extend, while Mac users can configure an extended desktop in Displays settings. Extending gives each screen an independent workspace rather than showing the same picture twice.
- Arrange and test the screens. Drag the numbered display icons so their positions match your physical desk. Move the mouse between screens and open a window on each display to confirm everything works.
This setup works with matching screens, different brands, and displays with different sizes in many common configurations. The computer still needs enough graphics capability and video bandwidth for the selected resolution and refresh rate. If a high-resolution screen drops to a lower refresh rate after adding another display, check the computer, dock, and cable specifications.
Which Connection Method Should You Use?
The simplest option is a direct connection from the computer to each screen. A dock becomes useful when a laptop has only one suitable host port or when you want power, USB devices, Ethernet, and displays connected through one desk cable. Technolf’s small-office technology guide also discusses docking stations and multi-screen equipment as useful parts of an office setup.
| Connection | Best use | Important limitation |
| HDMI | TVs, office screens, many laptops | The port version can limit resolution or refresh rate. |
| DisplayPort | Desktop PCs and higher-refresh displays | Less common as a full-size laptop port |
| USB-C | Thin laptops and USB-C displays | The computer port must support video. |
| Thunderbolt | Docks and higher-bandwidth laptop setups | The computer, dock, and cable must all be compatible. |
| DisplayLink adapter | Extra displays on systems with limited native outputs | Requires compatible hardware and software |
| HDMI splitter | Showing the same image on multiple screens | Usually mirrors instead of extending the desktop |
Connecting Two Screens When You Have Only One HDMI Port
One HDMI output does not necessarily limit you to one external display. Check for another video-capable port, such as DisplayPort, USB-C, USB4, or Thunderbolt, before purchasing extra hardware. If no second native output is available, a compatible dock or USB graphics adapter may provide another independent display signal.
A standard HDMI splitter normally sends the same video signal to both connected screens. That makes it useful for mirroring a presentation or TV feed, but it normally does not produce two independent desktop areas. Docks, native secondary outputs, DisplayLink solutions, and supported daisy-chain configurations are better options when you need an extended workspace.
DisplayPort or Thunderbolt daisy chaining can also work with compatible computers and displays. The first screen needs an appropriate output connection for the next display, and the computer must support the complete configuration. Support differs by hardware, so verify the specifications before buying a monitor based on daisy chaining alone.
Set Up the Displays in Windows 11
After connecting the hardware, open Settings > System > Display in Windows 11. Select Identify to see which numbered screen matches each physical display, then drag the display boxes until they match your desk arrangement. Microsoft also lets you select Detect under Multiple displays if an attached screen does not appear automatically.
Windows also offers a keyboard shortcut for faster display-mode changes.
- Press the Windows key + P.
- Select Extend for independent desktop space.
- Select Duplicate when you want identical content.
- Use the PC screen only or the second screen only when needed.
For normal work, Extend is usually the useful setting because windows can move between screens. You can also select each display separately to adjust its resolution, scale, orientation, and refresh rate. Set the screen you use most as the main display so the Start menu and primary workspace appear where expected.
Set Up Multiple Displays on a Mac
On a Mac, choose Apple menu > System Settings > Displays after making the physical connections. You can arrange the screens, select resolutions, and choose whether an external display extends or mirrors the desktop. Apple recommends checking the technical specifications for your exact model because supported display counts depend on the Mac, resolution, and refresh rate. You might also like DDL in SQL.
Current MacBook Air models provide a good example of why checking the model matters. Apple’s 2026 documentation says MacBook Air models with M4 and M5 chips support up to two external displays alongside the built-in screen within specified resolution limits. Older Apple silicon models can have different restrictions, so don’t assume one MacBook’s setup will work identically on another.
Check these items before setting up a Mac with two external screens.
- Your exact Mac model and chip.
- Apple’s listed maximum external-display count.
- Required resolution and refresh rate.
- HDMI or Thunderbolt connections available.
- Whether the dock or adapter specifically supports your Mac configuration.
What to Do If the Second Display Is Not Detected
A missing second screen is often caused by the input source, cable, adapter, dock, or display settings rather than the monitor itself. Start with the physical connection before changing advanced settings or installing software. If possible, test the problematic screen by connecting it directly to the computer with a known-working cable.
Try these fixes in order:
- Confirm that the display has power.
- Select the correct HDMI, DisplayPort, or USB-C input.
- Disconnect and reconnect the video cable at both ends.
- Swap in a known-working cable.
- Test a different video port.
- Restart the computer with both displays connected.
- In Windows, open Display settings and select Detect.
- Install current graphics and operating-system updates.
- Verify that the dock supports your screen count and resolution.
- Confirm that a USB-C port supports video rather than charging or data only.
Resolution and refresh-rate problems can also point to bandwidth limits. A dock or adapter may support a high resolution with one screen but provide less bandwidth when several displays are active. If your computer is aging and repeatedly struggles with current peripherals, Technolf’s guide to recognizing aging business computer hardware covers other signs that older systems may need attention.
Arrange Your Dual-Screen Workspace for Daily Use
Place the screen you use most directly in front of your normal seating position, then put the secondary display beside it. In Windows or macOS, arrange the virtual screens in the same left-to-right order as the physical setup. This prevents the pointer from appearing to hit an invisible wall when you move it from one display to the other.
You can also rotate a supported display vertically for long documents, code, messaging apps, or web pages. Adjust scaling separately if text appears much larger on one screen than the other. Matching every display specification is not required, although similar screen sizes and pixel densities can make the workspace feel more consistent.
Finish the Setup and Test Everything
Once the hardware is connected, confirm that both screens appear independently, choose Extend, and arrange them to match your desk. Check the native resolution and desired refresh rate on each display, then move several windows between screens to test the setup. If anything fails, troubleshoot the connection path from the computer port to the cable, dock, input source, and display settings.
For more computer hardware coverage, browse Technolf’s PC Builders section after your dual-screen setup is working. Checking compatibility before buying adapters or replacement hardware can save both time and unnecessary purchases. A few minutes spent verifying ports and display support is usually more useful than experimenting with incompatible cables.
Conclusion
Learning how to connect two monitors can significantly improve your workspace, whether you use a desktop PC, laptop, Mac, or business computer. In most cases, the process involves identifying compatible video outputs, connecting each display with the correct cable or dock, selecting the appropriate input, and choosing Extend rather than Duplicate.
The most important step is checking compatibility before connecting everything. HDMI, DisplayPort, USB-C, and Thunderbolt can all support external displays, but their capabilities differ. A USB-C port does not automatically support video, and a basic HDMI splitter generally mirrors one signal rather than creating two independent screens. Laptops with limited ports may therefore require a compatible dock, adapter, or supported daisy-chain configuration.
Frequently Asked Questions
First, check whether the laptop has another video-capable USB-C, USB4, or Thunderbolt connection that you may have overlooked. If it has only one usable display output, look for a compatible dual-display dock or USB graphics solution that supports your operating system. Always confirm the laptop’s maximum external-display support before purchasing the adapter.
A normal HDMI splitter is designed to send one source signal to several screens, so both displays usually show identical content. It does not normally create an independent second desktop that Windows or macOS can arrange separately. Use separate video outputs, a compatible dock, or another multi-display solution when you need extended screen space.
Many computers can use an HDMI output for one screen and DisplayPort for another at the same time. The graphics hardware must support the number of active displays and the required resolutions. Mixing connection types is often easier than trying to find two identical ports on the computer.
The displays do not usually need to be the same brand, size, or native resolution. Windows and macOS can configure many screens individually, including resolution and orientation settings. A closely matched pair can still make moving windows between screens more comfortable because text and interface elements appear more consistent.
If your desktop has a dedicated graphics card, connecting the displays to that card’s video outputs is normally the straightforward approach. Motherboard video ports may be disabled when a discrete GPU is installed, depending on the computer and firmware settings. Check the motherboard or computer documentation before mixing dedicated and integrated graphics outputs.