
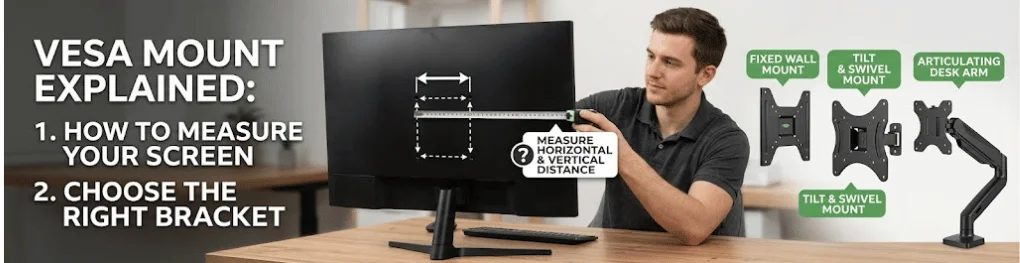
Buying a monitor arm or TV bracket gets much easier once you understand the mounting holes on the back of your display. A VESA mount uses standardized hole spacing so compatible screens and mounting hardware can connect without a brand-specific stand. We cover this in more depth in Ultrawide Monitor.
Quick answer: VESA mounting specifies the horizontal and vertical distances between the threaded holes on the back of a monitor or TV. Measurements are given in millimeters, such as 75 × 75, 100 × 100, or 400 × 400. Match that pattern, the display’s weight, and the required screws before buying a bracket.
| Key detail | What it means |
|---|---|
| Standard | VESA Flat Display Mounting Interface, or FDMI |
| Pattern format | Horizontal spacing × vertical spacing |
| Measurement unit | Millimeters |
| Common monitor patterns | 75 × 75 mm and 100 × 100 mm |
| Larger display patterns | Often 200 × 200 mm, 400 × 400 mm, or larger |
| Compatibility checks | Pattern, weight rating, screws, clearance |
| Used for | Monitor arms, wall brackets, stands, poles, and specialty mounts |
VESA says its FDMI standard was created for flat displays and mounting equipment across desktop, wall, overhead, mobile, and specialty applications. That common interface is why a screen from one manufacturer can often work with mounting hardware from another.
What Does VESA Mean?
VESA stands for the Video Electronics Standards Association, an international organization that develops standards for the display industry. Its work covers far more than mounting hardware, but FDMI is the standard for screen mounting.
For mounting purposes, the important feature is the group of threaded holes on the rear of a display. A specification such as 100 × 100 mm means the left and right holes are 100 mm apart. The upper and lower holes are also 100 mm apart. A 400 × 200 pattern measures 400 mm horizontally and 200 mm vertically.
The measurements are taken from the center of one mounting hole to the center of the next. Sony’s U.S. support guidance uses the same center-line method when explaining how consumers can identify compatible displays.
Common Mounting Patterns
Smaller desktop monitors commonly use compact square layouts. Larger monitors and televisions may require wider patterns.
Common sizes you may encounter include:
- 75 × 75 mm: frequently found on smaller monitors.
- 100 × 100 mm: common across many desktop monitors.
- 200 × 100 mm or 200 × 200 mm: found on some larger displays.
- 400 × 200 mm or 400 × 400 mm: common options for larger televisions.
- 600 × 400 mm and 800 × 400 mm: available on some large-screen TVs.
Sony lists patterns including 75 × 75, 100 × 100, 200 × 200, 400 × 400, 600 × 400, and 800 × 400 mm in its mounting guidance. Screen size alone doesn’t guarantee a specific pattern. Two televisions with similar diagonal measurements can use different mounting layouts. Check the manufacturer’s specification sheet whenever possible.
How to Measure a VESA Mount Pattern
If you can’t find the mounting specification in the manual, you can measure it yourself.
- Turn off and disconnect the display. Remove cables that could get caught while you handle the screen.
- Place the screen safely. Follow the manufacturer’s handling instructions. Large televisions may require two people.
- Find the threaded mounting holes. They normally form a square or rectangle on the rear panel.
- Measure horizontally. Measure from the center of the left hole to the center of the corresponding right hole.
- Measure vertically. Measure from the center of an upper hole to the center of the lower hole beneath it.
- Record both numbers in millimeters. Write horizontal first and vertical second.
- Compare the result with the mount specifications. The bracket must support your exact pattern or include a compatible adjustment range.
For example, 100 mm in both directions gives you a 100 × 100 mm pattern. If the measurements are 400 mm horizontally and 200 mm vertically, the pattern is 400 × 200 mm. Don’t measure diagonally or from the outside edge of each hole. Center-to-center measurement is the correct method.
Pattern Size Is Only One Compatibility Check
Matching the mounting holes is essential, but it doesn’t prove the entire installation is suitable.
Check the display weight
Every monitor arm and wall bracket has a maximum supported load. Compare that limit with the display’s weight as specified by its manufacturer. Be careful when a manufacturer publishes several weights. A product page may distinguish between weight with the original stand and weight without it. For mounting purposes, follow the mount and display manufacturers’ instructions. A bracket with the correct holes but an inadequate load rating isn’t an acceptable match.
Check screw specifications
Mounting screws can differ by display size and interface type. The FDMI system uses metric fasteners, with different parts of the standard specifying different mounting arrangements. Don’t assume a screw fits because it starts threading into the hole. Diameter, thread, and permitted insertion depth matter.
Using a screw that’s too short can prevent proper engagement. A screw that’s too long can also create a problem inside a display. Use the hardware specified by the screen manufacturer or mounting instructions.
Look for recessed mounting holes
Some displays place their mounting interface inside a recessed area. A large mounting plate may not sit flat against that surface. Spacers or a manufacturer-approved adapter can sometimes solve the problem. Check cable ports too. A bracket shouldn’t block connections you need for HDMI, DisplayPort, USB, power, or other cables.
Monitor Arm vs. TV Wall Bracket
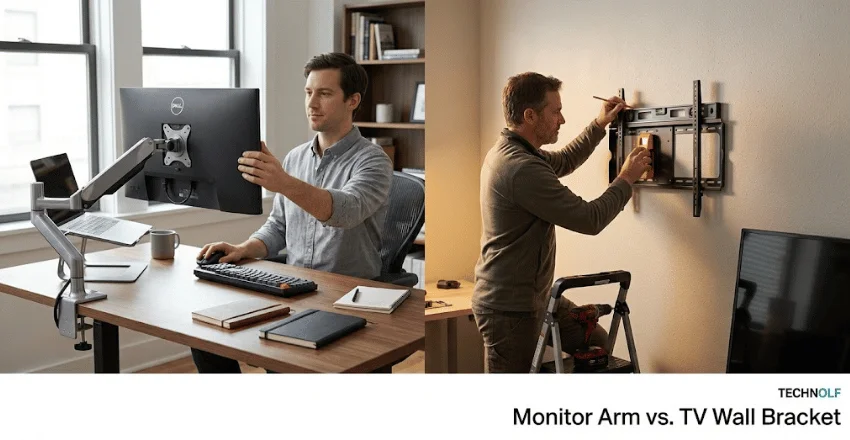
The same standardized mounting concept can support several types of hardware, but the installation requirements aren’t identical. A monitor arm usually emphasizes desk attachment, movement, tilt, swivel, height adjustment, and load capacity. It can be useful when setting up an ergonomic workstation or freeing desk space.
Technolf’s guide to must-have technology for a small office also discusses office hardware and ergonomic peripherals. A movable display arm can fit naturally into that type of workstation planning.
A TV wall bracket has another major consideration: the wall itself. The mounting surface, fasteners, studs, masonry, bracket design, and installation method must collectively support the complete assembly safely.VESA’s standard defines the display mounting interface. That does not mean every wall, desk, or mounting location is suitable.
What If Your Monitor Doesn’t Have Standard Mounting Holes?
Some monitors use proprietary stands or don’t provide exposed standardized holes. That doesn’t always rule out mounting. You may find a model-specific adapter that connects the monitor’s original stand interface to a standard mounting plate.
Before buying an adapter, verify:
- the exact monitor model it supports;
- the pattern provided on the adapter;
- its load rating;
- compatibility with your chosen arm;
- whether it interferes with cooling vents or ports.
Avoid improvised brackets that grip a display in ways the manufacturer didn’t design for.
If you’re refreshing an older workspace rather than adapting outdated hardware, Technolf’s article on when to recycle business computers provides useful guidance for evaluating aging equipment.
How to Choose the Right Mount
Use a compatibility-first approach instead of shopping by screen size alone. Start with the display’s model number. Find its official mounting pattern and weight. Then compare those specifications against the bracket or arm.
Next, think about how you want the screen to move. A fixed wall bracket is different from a tilting mount. A full-motion television arm places different forces on its installation surface. Desk monitor arms may use clamps, grommets, or other attachment methods.
For more computing and hardware coverage, browse Technolf’s PC Builders section. For U.S. buyers, remember that VESA dimensions remain metric even when a retailer lists product dimensions in inches. For reference, 100 mm is about 3.94 inches, but use millimeter specifications when matching patterns. Sony’s U.S. support page likewise identifies mounting patterns in millimeters.
Common Buying Mistakes to Avoid
Most compatibility problems come from checking only one specification. The most common errors are choosing a bracket based only on screen size, measuring between hole edges, overlooking the weight rating, using unverified screws, or failing to notice a recessed mounting area.
Cable clearance is another easy detail to miss. A plate can technically fit the holes yet make a rear-facing connection difficult to reach. Check the complete installation before ordering. That small amount of preparation can save you from having to return hardware or take a mounted display apart twice.
Check Compatibility Before You Buy
Before buying a VESA mount, confirm four things: the hole pattern, display weight, screw specification, and physical clearance around the mounting area.
Those checks matter more than the screen’s advertised diagonal size. Once they match, you can compare movement, desk attachment, wall installation, cable management, and other features based on how you plan to use the display.
FAQ
A VESA mount is a standardized mounting interface used on many flat-panel monitors and TVs. It specifies the spacing between threaded mounting holes, typically expressed as horizontal distance × vertical distance in millimeters.
Check the monitor’s manual or manufacturer’s specification page first. If the information isn’t available, measure the rear mounting holes horizontally and vertically from center to center.
No. Both measurements must match a pattern supported by your mounting plate. A rectangular 100 × 75 layout is different from a 100 × 100 square.
Only if the product documentation says it also supports your display’s exact pattern. Many universal brackets support several hole arrangements, but you shouldn’t infer compatibility from the largest listed size.
No. Screw requirements vary with the mounting interface and display design. Check the manufacturer’s documentation for the required diameter and length rather than choosing screws by appearance.
Sometimes. Model-specific adapter plates are available for certain displays. Confirm that the adapter supports your exact monitor model, its weight, and the arm’s mounting plate before installation.